
Automation
Using Your Apple Watch To Trigger Your Screensaver
I sometimes work in a corporate-y office. I also tend to walk around a lot, and leaving your computer unlocked can be dangerous. Naturally, I have a workflow that will allow me to lock my computer from afar when I’ve wandered off.
There are a few nerdy tools needed, but you should have these anyway.
- Workflow, an awesome iOS automation app
- Hazel, a great automated organizer app for your Mac.
- Dropbox.
- and of course, an iPhone, Apple Watch and a Mac.
First thing you will want to do is put a text file in an accessible folder on your Dropbox. I use Launch Center Pro for a lot of other automation, so I put the file in Dropbox/Apps/LCP because I’m already monitoring that folder with Hazel. More on that in a bit. Name the file something creative, like sleep.txt.
Now go to your System Preferences and open Hazel. In the left pane, click the "+" button and add the folder your text file is in (mine is in /Apps/LCP, but yours can be anywhere on your Dropbox.) Then, in the right pane, click the other "+" button to add a new rule.
- Name it something recognizable
- If ALL of the following are met:
- Name IS sleep.txt
- Date Least Modified IS IN THE LAST 1 minute
- Do the following:
- Run AppleScript - embedded script
Then, paste in the following simple AppleScript, which starts the screensaver.
	tell application "ScreenSaverEngine"
        activate
        end tell

Great. What the hell just happened? You just told Hazel that if the sleep.txt file has changed in the last minute, then run this script that starts the screensaver. You can test this by just opening sleep.txt and typing a letter or two then saving. Once the save is complete, the Last Modified timecode changes to now, which is obviously in the last minute. So, the screensaver starts up. Pretty sweet. Now, to activate this from the Watch.
On your iPhone, fire up Workflow and create a new one. Make sure it’s set up as an Apple Watch workflow. Choose an appropriate name and icon. Then build a simple two-step Workflow:
- Text (can be anything, I use “Go to sleep”)
- Append to Dropbox File
- Mode: Append
- File Path: /Apps/LCP/sleep.txt
- Make New Line (optional, but I leave it on)

Now, when you tap this Workflow from your Watch, a line of text is appended to the text file, which changes the modify date, which launches a screensaver.
If you don’t want to build it yourself, you can download my Workflow here. As an added bonus, you can also add this Workflow to your iPhone’s home screen and run it from there, just select “Normal” in the workflow setup. The only limitation to this way of doing things is you can only trigger the screensaver once a minute.
Have fun with this. If you’re using it, let me know on the Twitter!
Using Keyboard Maestro for Print Layout in Sketchup
In my “real job” as a carpenter, I use SketchUp pretty heavily to do quick and dirty drawings and 3D models to visualize complex pieces.
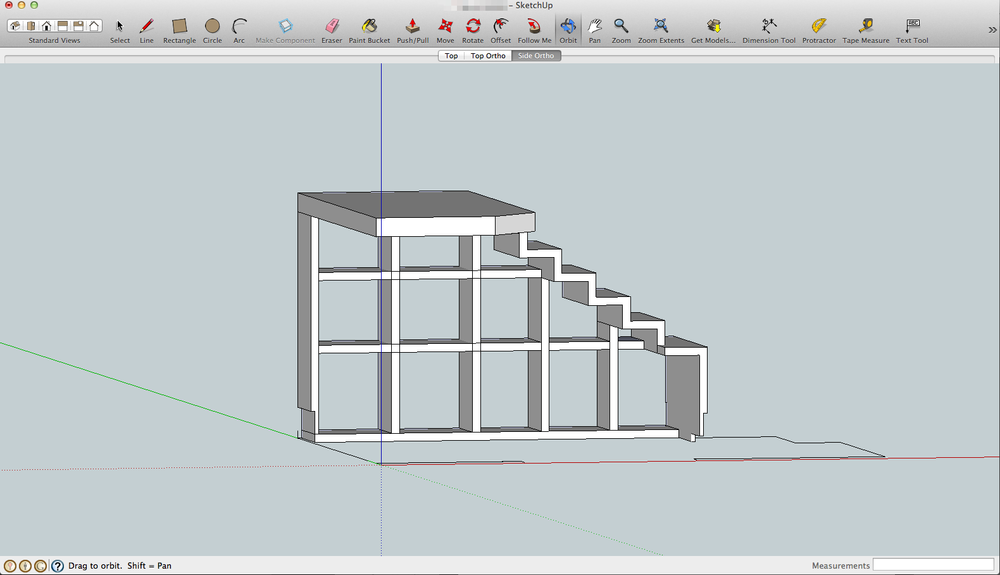 This is a preliminary sketch, so no judgey-wudgy there, Picasso.
I’m currently working on a playroom, and need a Tansu-inspired stair-step storage unit. That’s not the point. I draw it up in Sketchup and get something like the picture above.
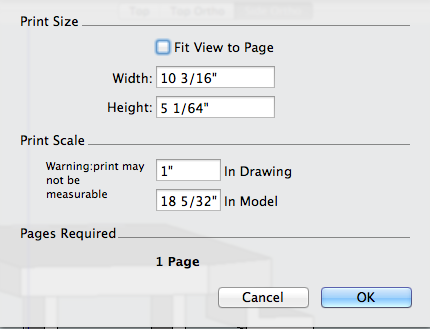
The problem is, there are pretty terrible print layout options in SketchUp. You basically can set a scale, then print what’s in the window. So, I always have to resize the window to be about the size of a sheet of paper in order to get the right proportions.
What do I do when I have to do something more than once or twice?
Automate it!
For this, I use the ever-more-useful-to-me Keyboard Maestro. It’s a Mac app that can do a metric crap load of stuff. It does keyboard shortcuts, window management, it can run AppleScripts, run multiple clipboards, and more. Actions are triggered by hotkeys, time, wifi connection, USB connect/disconnect, or just about anything else you can do to a computer.
For this fun bit, open the Keyboard Maestro editor and follow these steps:
- Make a new macro by clicking the little “+” at the bottom.
- Choose “Triggered by…” Choose This hot key
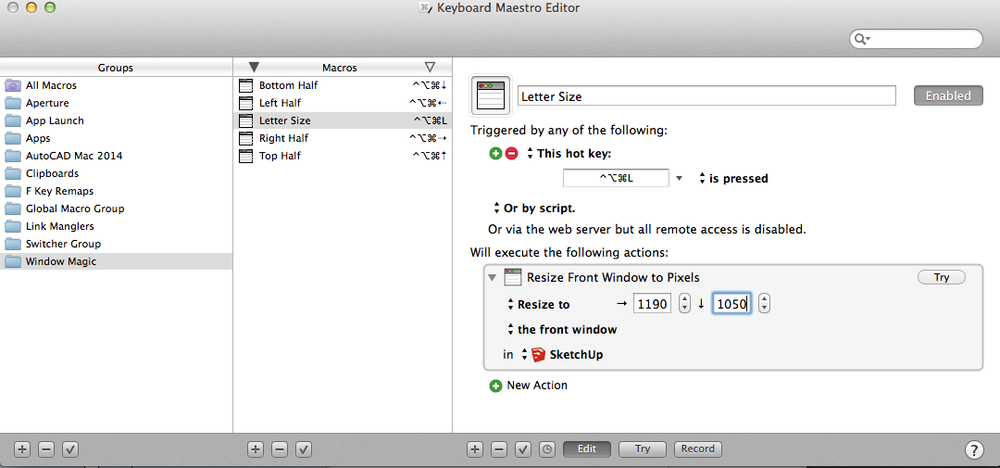
- Pick a hot key. I use ^⌥⌘L. As you can see by the screenshot, I smash those three down for all my window actions.
- Click in the dotted box that says “No Action” to get the action sheet.
- Drag “Manipulate a Window” onto the No Action Box
- In the “Scale Size By” drop down, choose Resize To.
- Fill in 1190×1050. It seems out of proportion for an 11″ x 8-½" box, but this includes the menubar and title bar. The actual drawing area will be just about letter-sized. [1]
- To limit it to SketchUp, choose SketchUp from the “in” drop down at the bottom. If SketchUp is running, it will appear in the list, if not choose from the “Other” menu.
- That’s it. It should look a little like this:
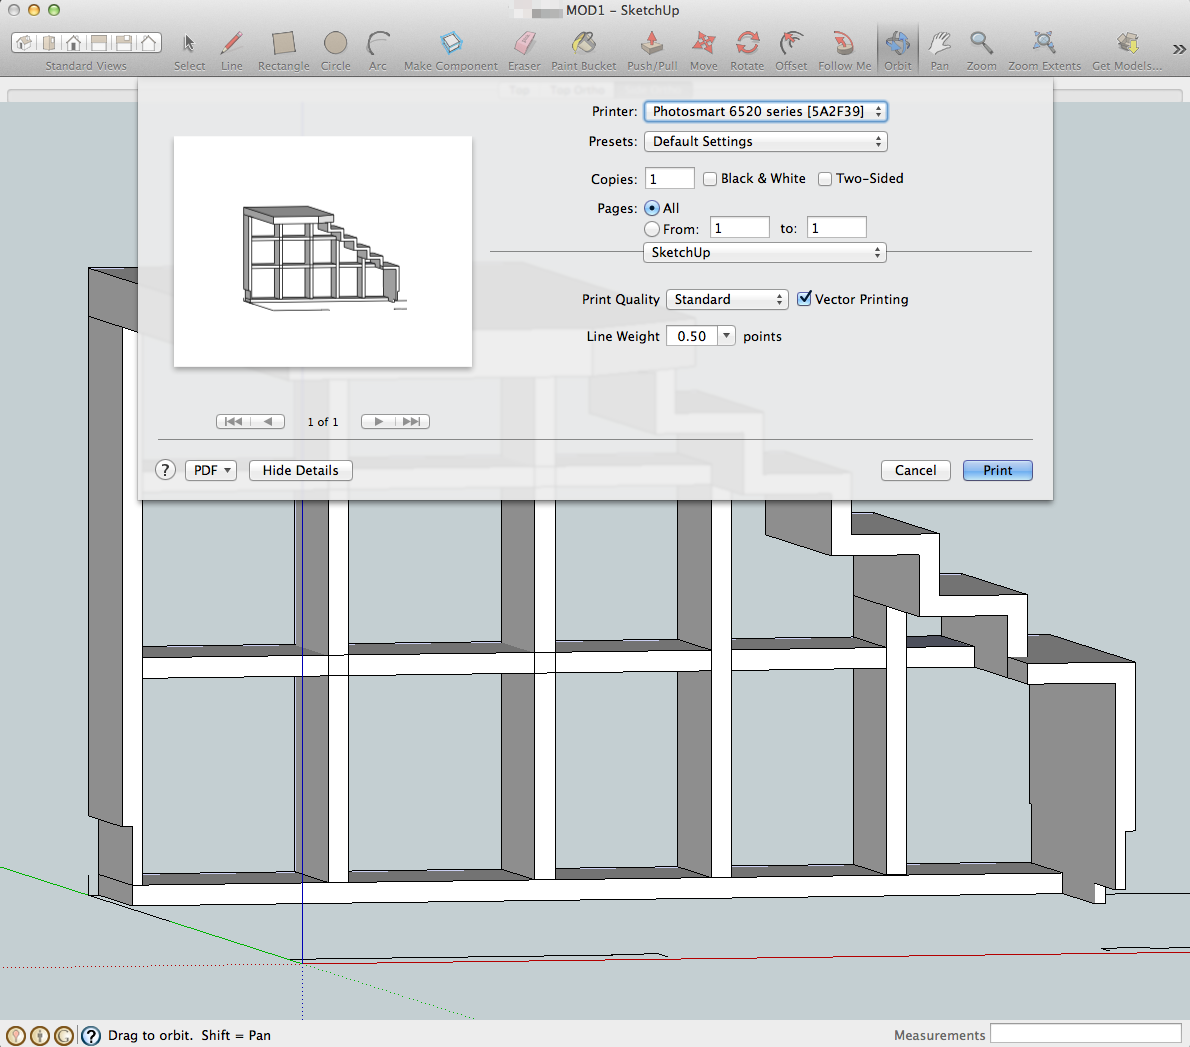
Now, smashing ^⌥⌘L resizes the Sketchup window to letter-size so I can arrange the drawing appropriately and print.
[1] Yes, this is for US letter sized paper. If you’re using A4 or legal or whatever, adjust the proportions appropriately. Also, the 1190×1050 is nice on my 27″ iMac, you may need to scale it down for your display.
If THIS, then THAT
Do you internet? If you do, you should check out If This Then That. IFTTT rhymes with “lift” without the L if you ever find a need to say it out loud, which would be weird.
In a nut, IFTTT will connect all of your various disconnected internet-y things. There are currently 83 “channels” in IFTTT. A channel is basically a service. Gmail is a channel. Foursquare is a channel. Twitter, Facebook, YouTube, and all the usual suspects are there. So are more obscure ones like Bitly, WeMo, WiThings, iOS location, Philips Hue, and something called “Reddit”.
That’s all well and good, but you’re asking yourself “So what? What can this incredible free service do for me? Where’s my waffle?”
Here’s what I use it for…
- I have a recipe (that’s their word, not mine) that saves my FourSquare check-ins to a Google Calendar.
- If I tweet, post it to Facebook. (For me, Facebook is just the place where you can read my tweets for a glorious second time.)
- When I get close to home (using iOS Location Services with the IFTTT iPhone app), turn on my Philips Hue lights.
- If I forward a receipt to my Gmail with the word “receipt” in the subject line, it adds a line with the attached image to a Google Spreadsheet. I use this to keep track of business expenses.
- If i take a front-facing camera picture (unfortunately called a “selfie”, I hear), it moves it to a separate album on my phone.
- If a certain bit of text shows up in an RSS feed, it goes straight to Pocket.
- Photos from Twitter, Instagram, and Facebook that have me tagged get downloaded to Dropbox.
- My iOS, Instagram, Facebook, and Twitter photos all get uploaded to Flickr.
Using it is easy. Just sign in to each service you want to activate, then either build a custom recipe by choosing the “this”, then choosing the “that”. If you’re a little soft on the idea, there are hundreds of pre-existing recipes to do common things. So go ahead and set it up so you get a text message every time a new video of a cat falling over gets posted on Vimeo.
I have 46 active recipes right now. I am an automation nut. If I have to do something twice, I will spend 30 minutes setting up IFTTT, Hazel, or Automator so I don’t have to do it a third time. Go check out IFTTT. They are not a sponsor, or anything. I just use the hell out of the service and I think you should, too. I’ll be posting IFTTT recipes, Hazel magic, and Automator scripts here on Nerd Stuff periodically. I can’t help you with the waffle, though. You’re on your own there.